So, your GE universal remote is not working, and you are wondering how to fix it, right? Well, you are in the right place! In this scenario, your first instinct might be to replace it right away. But before you decide to replace it or give up troubleshooting yourself, let’s explore some simple tried-and-tested methods to fix the issue. In most cases, a few simple troubleshooting steps can bring your remote back to life.
In this article, I will break down the causes of the most common GE remote problems and guide you through the solutions to get it working again. So, let’s dive in and fix it together!
Contents
- Why GE Universal Remote Isn’t Working
- How to Fix the GE Universal Remote Not Working Issue
- When to Consider a Replacement
- Troubleshooting GE Remote Made Easy
- FAQs
- My remote is programmed, but some buttons aren't working. What should I do?
- Will I need to reprogram my remote after changing the batteries?
- I can change the volume but not the channels. What should I do?
- Why is the red light on my remote not working?
- Why is the menu button on my GE universal remote not working?
Why GE Universal Remote Isn’t Working
There are several reasons why your GE remote is malfunctioning. Usually, the problem starts from something as simple as dead or weak batteries that seriously affect the remote’s signal strength.
Another simple issue that most of us don’t think of or care about is signal interference and physical obstruction. If anything is blocking the signal, your remote won’t work properly.
In some cases, incorrect programming can be the culprit. The remote can stop functioning properly if programmed with the wrong code. Additionally, physical damage, such as damage to an infrared (IR) sensor, can also contribute to poor remote performance.
How to Fix the GE Universal Remote Not Working Issue
Below is a step-by-step troubleshooting guide starting with the simplest solutions and gradually moving toward more advanced troubleshooting methods.
1. Check the Batteries
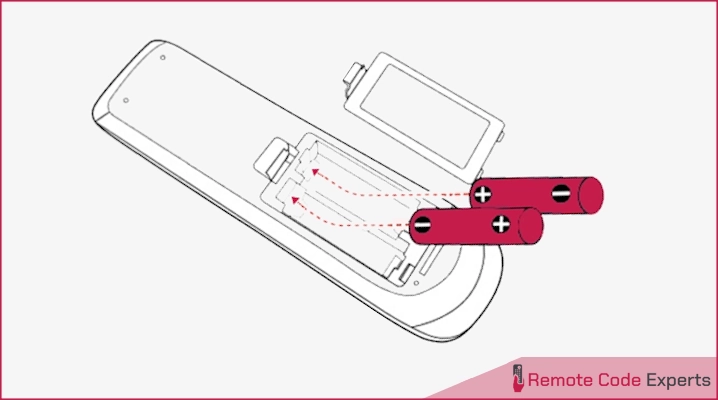
Make sure your batteries have enough charge in them. If you’re unsure, replace both with fresh ones and avoid mixing old and new batteries. Additionally, don’t combine different types, such as alkaline, standard, or rechargeable, as this can lead to performance issues.
It’s also important to check that the batteries are correctly inserted in their slots, matching the (+) and (-) marks on the battery with the corresponding symbols inside the battery compartment. While changing the batteries, try not to leave the compartment empty for more than 10 minutes, as this may cause the remote to lose its programmed settings.
2. Confirm Device Compatibility
Not all GE remotes work with every device. Even if it seems like the remote should work with your TV, soundbar, or streaming box, some models just aren’t compatible. For example, even the latest models like 24927, 37038, 37123, etc., are not compatible with Roku Streaming Sticks, Amazon Fire TV/Sticks, or other RF (Radio Frequency) streaming devices. You can check the compatibility in your manual or head to GE’s official website to search for your remote model and check there.
3. Check for Interference Issues
Interference is a simple and overlooked reason why remotes don’t work. Objects like books, furniture, or even decorations can block the signal between the remote and your device. Other electronics like Wi-Fi routers, Bluetooth gadgets, or fluorescent lights can also interfere, especially if their signals overlap or cause electromagnetic interference.
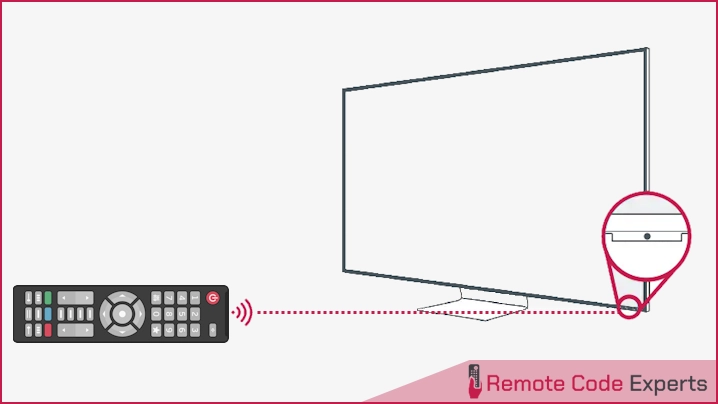
To avoid this, make sure there is a clear line of sight between the remote and the device, and try moving wireless devices further away to reduce signal interference. A slight adjustment in your setup often solves the problem.
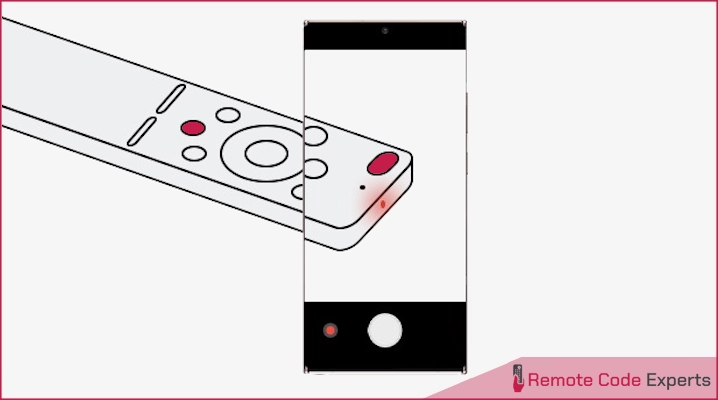
4. Check for IR Signal Issues
7. Reset the Remote
In my experience, resetting the remote fixes this issue in no time as it quickly restores it to its factory settings. A simple reset can eliminate glitches, fix programming errors, and give you a clean memory to reprogram the remote. It’s also beneficial when pairing new devices, as previous settings can sometimes interfere with the process.
To reset a GE remote, follow these steps:
- Press and hold the Setup button until the red indicator light turns on.
- Press the Mute button, followed by 0 (zero).
- The remote’s light will blink twice, confirming the reset.
While this method works for most models, there are 2 other ways to reset GE remotes. Check out our complete guide on resetting GE universal remotes for more details. Once you reset your remote, proceed to reprogram it.
8. Reprogram the Remote
If your GE remote is brand new, it won’t work right away since it’s not usually pre-programmed (except for some latest models) for any specific device. You’ll need to program it manually.
If the remote was previously programmed and suddenly stopped working, the settings may have been erased, often due to battery drainage. On most GE remotes, removing the battery for more than 10 minutes can wipe out the saved codes from the built-in code saver. In this case, you’ll need to reprogram the remote.
To program your GE remote, read our comprehensive guide, which includes a code lookup tool for different code types (CL3, CL4, CL5, CL6). When selecting a code for your device, start with the first on the list. If it doesn’t work or only works partially, try the next one until you find the right code.
9. Fix or Replace Damaged Buttons
Sometimes, some remote buttons become less responsive and require harder pressing or inconsistent working, such as the volume button only working intermittently or stopping altogether. The issue will be with the conductive silicone rubber pads (membrane pads) inside your remote.
Each button on the remote connects to a contact point on the circuit board, and a membrane pad inside creates a connection when pressed. Due to prolonged use, the conductive material on the pads may wear off due to dirt, dust, or simple wear, reducing the effectiveness of these contacts.
Now, if you are like me and want to fix it yourself, we have two different methods.
Using Replacement Pads
To replace the conductive rubber pads, follow these steps:
- Open the Remote: Use a small screwdriver to open the casing carefully; there is no need to rush here. A little patience goes a long way. Once it’s open, gently detach the circuit board and rubber membrane.
- Check the Circuit Board: Take a quick look for any dust, corrosion, or dirt. If you spot anything, brush it off with a soft brush or cloth. No fancy tools are needed; just give it a light clean so the contacts aren’t blocked by debris.
- Clean the Contacts: If the buttons are acting up, dirt build-up on the contacts could be the issue. Dampen a cotton swab with a little isopropyl alcohol and carefully wipe the contacts. A light touch is all you need; no need to scrub.
- Check the Rubber Membrane: Over time, the rubber membrane under the buttons can wear out. If the conductive pads look rough or worn, you’ve got two options: order replacements online or get creative and repurpose pads from an old or unused remote. If there’s a button on this remote you rarely use, you could even swap it in – no shame in a little DIY!
- Reassemble the Remote: Carefully put the remote back together after cleaning or replacing the necessary parts. Ensure all buttons are correctly aligned with the contact points on the circuit board.
- Test the Remote: Once reassembled, insert the batteries and give it a try. If everything works, you’ve successfully restored your remote’s buttons.
Applying Electric Paint
Electric paint is a conductive metallic liquid that can be used to repair or enhance electrical connections in devices like remotes. When applied to worn-out or damaged areas, such as the conductive pads on a remote’s rubber membrane, it restores functionality by allowing electricity to flow properly. It’s a quick DIY solution to fix unresponsive buttons, avoiding the need for replacements or more complex repairs.
To apply electric paint, follow these steps:
- Disassemble the Remote: Open the remote with a small screwdriver to access the button contacts and rubber pad.
- Clean the Contacts: Dip a cotton swab in a little isopropyl alcohol and wipe down both the rubber pad and the contact points on the circuit board.
- Apply Electric Paint: Carefully apply a thin layer of electric paint to the back of the rubber button. Keep it neat – just enough to cover the area without spreading beyond the contact point.
- Let It Dry: Give the paint some time to dry fully. Be patient. Trying to reassemble the remote too soon could smudge the paint and undo your hard work.
- Reassemble the Remote: Once the paint is dry, align the rubber pad and circuit board properly and put everything back into place. Make sure all parts sit where they belong.
- Test the Buttons: Insert the batteries and test the remote. If some buttons still don’t respond, you can try applying another layer of paint. If all else fails, it might be time to consider replacing the remote.
These repair methods are more cost-effective and eco-friendly than replacing the remote entirely. But, in some cases, if multiple buttons are damaged or the damage is to the circuit board, it might be more practical to replace the remote altogether, especially if it’s an older model. But these simple fixes can extend your remote’s life if it’s just a couple of buttons.
10. Contact GE Customer Support
If you’ve tried everything and still your remote isn’t working, don’t stress! GE’s customer support team is just a call away. Before you call, make sure you have the model number of your remote and a list of the steps you’ve already tried, which will make the process smoother. You can contact them through their live chat, phone, or email, and they might guide you through additional troubleshooting or confirm if the remote needs replacing.
When to Consider a Replacement
If nothing seems to work, it might be time to replace the remote. The common signs that indicate the need for a replacement are:
- Physical Damage: If the remote has significant wear and tear, like a broken casing, non-responsive buttons, or a damaged IR sensor, repairing may not be cost-effective.
- Repeated Malfunctions: If the remote frequently loses programming or fails to control your devices even after multiple resets and reprogramming attempts, it’s likely beyond the scope of repair.
- Outdated Model: Older models may lack compatibility with newer devices or features, making an upgrade more efficient for your setup.
- Inconsistent Performance: If the remote works inconsistently, despite fresh batteries and proper programming, a hardware issue could be the problem, requiring a replacement.
If you’re considering replacing your GE universal remote or upgrading to a more advanced model, here are 2 of my favorite alternatives that offer advanced features and compatibility are GE UltraPro (8-Device) and SofaBaton U2.
Troubleshooting GE Remote Made Easy
To wrap things up, fixing a malfunctioning GE universal remote isn’t as complicated as it might seem if you follow the right steps. Whether it’s something as simple as swapping out the batteries or diving into a full reset, the steps in this guide have you covered. From stubborn IR signals to buttons that just won’t cooperate, you’ve got practical solutions right at your fingertips. With a little patience, your remote will work like new, saving yourself the headache (and expense) of going for a replacement. Who knew troubleshooting could be this satisfying?
Hopefully, these tips will save you some frustration! Bookmark this page and share it with your friends because we know remotes have a habit of acting up again when we least expect it.
Happy troubleshooting! ✨
FAQs
Will I need to reprogram my remote after changing the batteries?
No, the built-in code saver retains your programmed codes for up to 10 minutes, so you can change the batteries without reprograming your remote.
I can change the volume but not the channels. What should I do?
If you have a cable, satellite, or converter box, your channels are controlled through that device instead of your TV. So, you'll need to program the universal remote to control your cable, satellite, or converter box.
Why is the red light on my remote not working?
The red light not working is most commonly due to bad batteries. Even brand-new batteries occasionally have issues, so try replacing them with a different set to see if the light functions correctly.
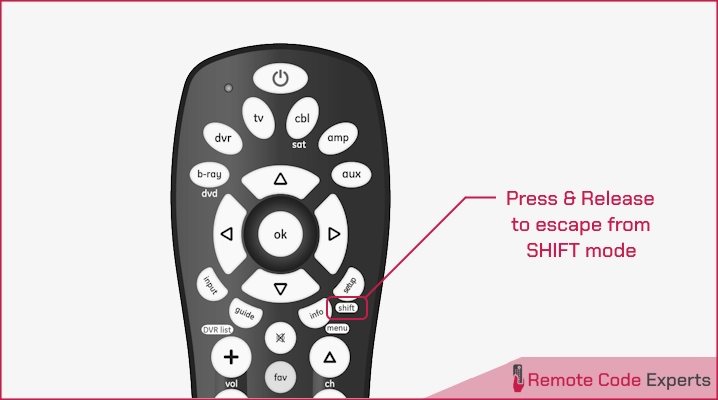
Your remote might be in shift mode. Press and release the shift/setup button, then use the menu/information button while the red light blinks. If this doesn't resolve the issue or your remote lacks a shift function, try reprogramming it with a different device code.

